28-201 Vilniaus Street, 3rd Fl., LT-01402, Vilnius, Lithuania
Contact us. We are here for you
Get a fast response to any question
Write to us:
Our vibrant offices:
Vilnius
Bucharest
153-155 Dacia Boulevard, 2nd fl., Dist. 2, Bucharest, Romania
Send us a Message
FAQ
Applying for Account
Follow the link and apply for a new account. Here’s a short video about how to register for a Wallter account.
We provide corporate accounts tailored to business needs. Follow the link to explore more details about our accounts and the full fee schedule along with our range of services.
Ensure you have the following documents available: Registry Extract/Certificate of Incumbency and Memorandum and Articles of Association. Additional supporting documents will be required, depending on the type of account you wish to open and other parameters such as jurisdiction, incorporation date, and licensing requirements. We’ll guide you on the specific documents to submit based on the information provided during the onboarding process.
You can read more details in our blog posts:
- European Companies – Best Practices for European Companies Opening a Borderless Bank Account
- Non-European Companies – A Guide for Non-European Companies Opening a Borderless Bank Account
Once you fulfill all the requested requirements and provide the necessary documents, it takes 1 to 5 working days for the account to be approved.
Wallter offers remote identification methods, so the individual KYC (Know Your Customer) can be completed remotely. See here How to correctly complete Wallter’s identity verification process.
To pass identity verification, you will need to have your valid passport or ID document and a proof of address. An acceptable proof of address is a document that confirms your current residential address, such as a utility bill (electricity, water, gas, or landline phone) or a recent bank statement.
Follow the link to see the fee schedule.
The full list of prohibited businesses and jurisdictions can be found here.
Corporate Cards
You can order a prepaid business card by emailing us at [email protected]. Currently, the cards are available only for existing clients.
Contact your account manager to activate your card.
Please login to your cardholder portal at https://login.crunchpayments.com, go to account settings – activation code.
Log in to your cardholder portal at https://login.crunchpayments.com/ to access your statement.
Yes, they are. All of Wallter’s prepaid business cards, including both the physical and virtual versions, are fully compatible with popular mobile wallets. This means you can easily add your card to Google Pay and Apple Pay to make fast, secure, and contactless payments with your smartphone or smartwatch.
You can make purchases using your card wherever Mastercard is accepted, both online and at any Point-Of-Sale (POS) terminal. Additionally, you can withdraw cash from any ATM that accepts Mastercard.
You can easily tup-up your prepaid card from your Wallter account.
If your card is lost or stolen, please report it to your account manager at [email protected] immediately, and proceed to block your card at https://login.crunchpayments.com/.
Private Data Protection
We do not sell, lease or rent your personal data in any way. We may disclose your personal information to companies within the Wallter Group, our merchants, fraud and credit reference agencies we use for onboarding in accordance with our Privacy Policy. This may be necessary in order to, among other things, fulfill your request, process your payment details, provide support services and monitor fraudulent activities. When mandatory by law, we may be obliged to disclose your personal data to certain authorities and law enforcement agencies. Please note, we may share your personal information with third parties only in ways that are described in our Privacy Policy.
On our website, we use only the necessary cookies that are crucial for the basic functions of the website. These cookies do not store any personal identifiable data. For more information on cookies, please refer to our Privacy Policy.
Online Managment
To change these details you need to write an email to [email protected].
Send your request to [email protected] and our support team will guide you.
A monthly statement is issued automatically. You may find it here: Login >> Report: Statement Report.
Go to Between My Accounts -> When choosing two of your accounts with different currencies, the platform will automatically offer a currency conversion. You can select whether you wish to sell or buy currencies, specify the amount, and choose the ‘From’ and ‘To’ accounts for the transfer.
Currently, we support the following currencies: EUR, USD, GBP, and ILS.
Please contact us for additional currencies.
To receive funds in your account, you must utilize all your bank details. You can find them in the reference letter you received during the onboarding process. Further details can be found in our User Manual.
Yes, you can receive SEPA and SWIFT payments.
Yes, you can send SEPA and SWIFT payments using the Transfer Money function.
If you have forgotten your password and need to reset it, click ‘Forgot my password‘ on the Login page and follow the necessary steps.
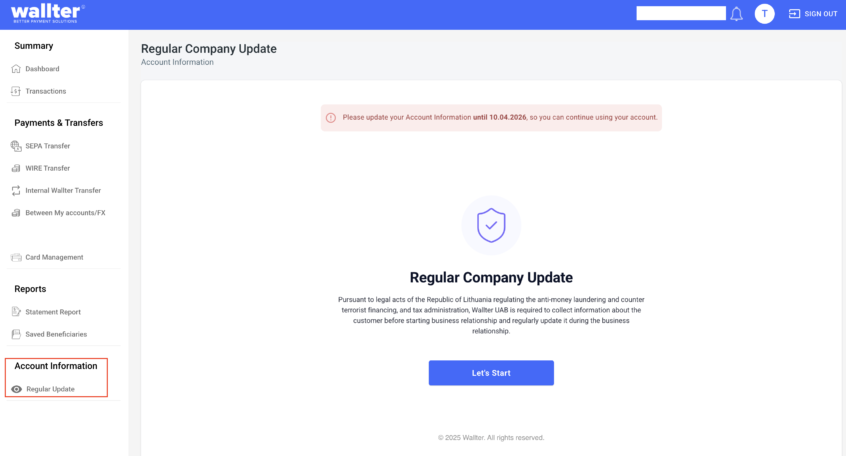
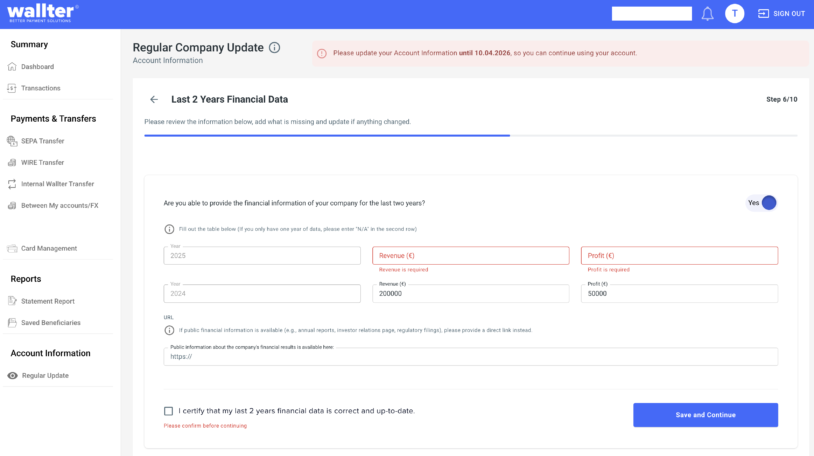
As part of our regulatory obligations, we periodically ask Clients to confirm and update their company information as part of our Ongoing Due Diligence (ODD) process.
This process is called a Regular Company Update. It allows you to review your company details, upload required documents, and confirm the information by signing a declaration.
The process is simple and can be completed directly through your Client account.
Start Your Regular Company Update
- Log in to your Client account
- Open the Regular Update section.
- Click Let’s Start to begin.
You will see a series of steps asking you to review and update your company information.
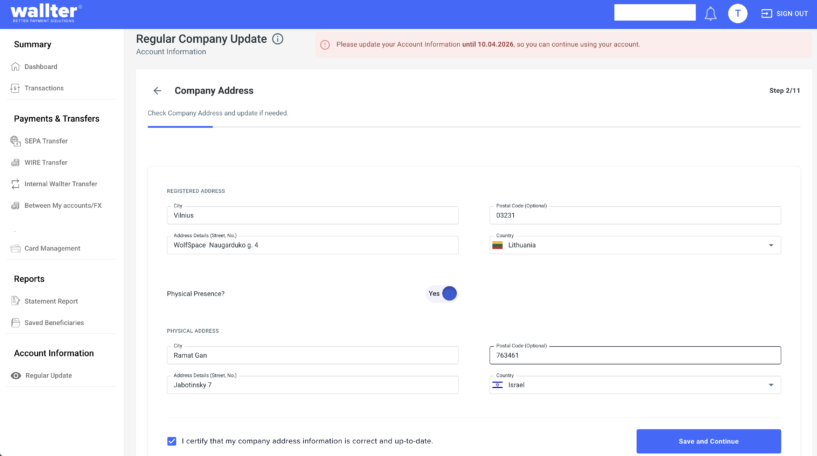
Review and Update Company Information
You will be asked to review and update the following sections:
- Company Information
- Company Address
- Operational License
- Financial Information
- Transaction Performance
- Last 2 Years Financial Data
- Main Business Partners
- Website(s)
- Company Structure
Make sure all information is accurate and up to date.
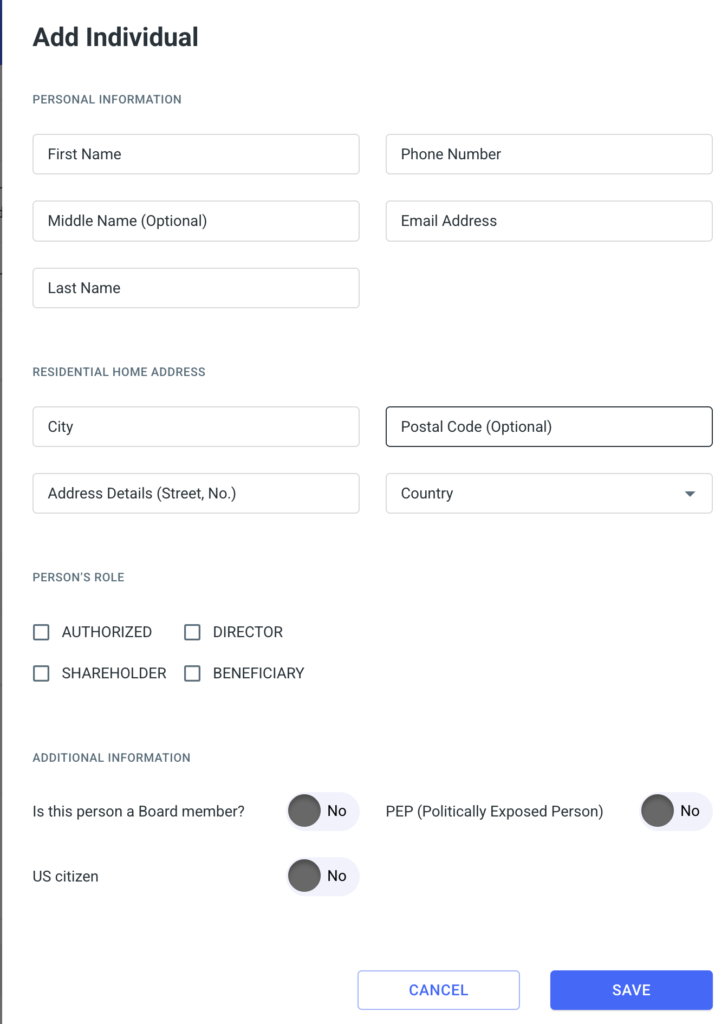
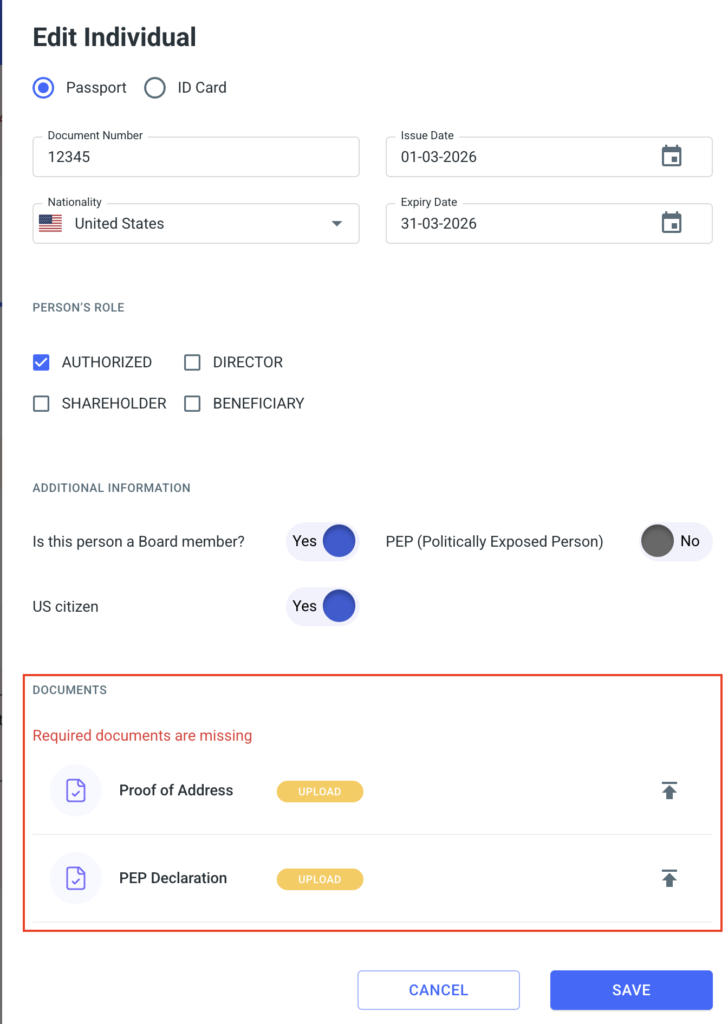
Update Company Structure
In this step, review your company’s ownership and management structure.
This includes all Individuals and Entities currently or previously involved in the company.
Adding New Structure Members
If a new person or company has joined since the last review, add them.
To add a new member:
- Click Add Individual or Add Entity
- Enter the required details
- Click Save
Ensure all information is accurate and complete.
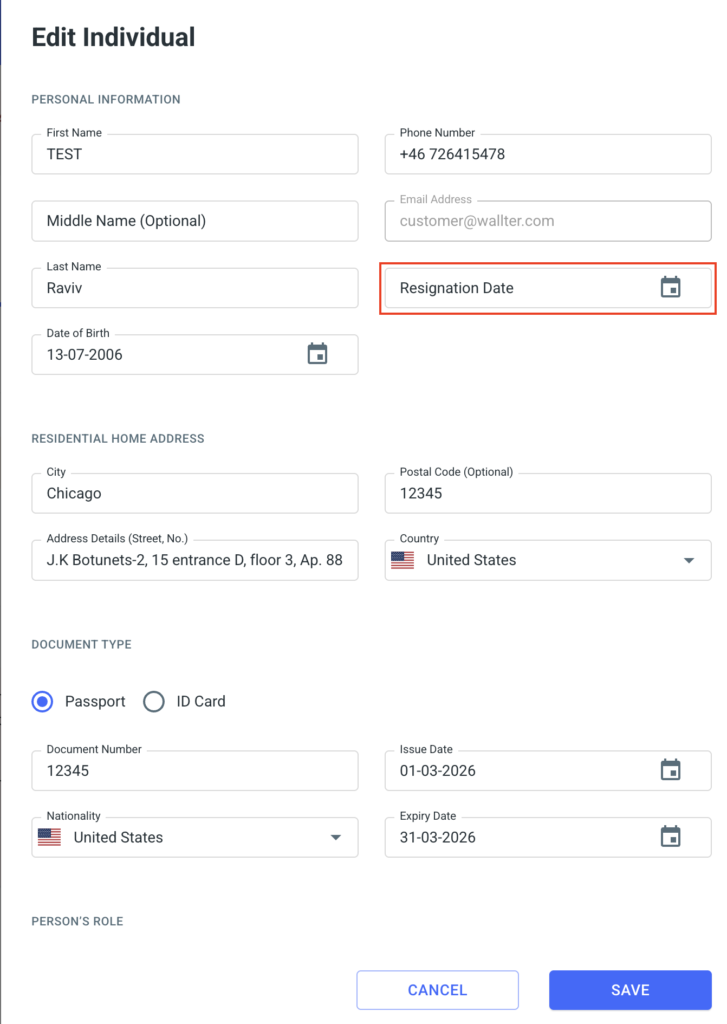
Marking Members Who Are No Longer in the Structure
If a person or company is no longer part of your structure, do not delete the record.
Instead, add a Resignation Date.
To do this:
- Find the Individual or Entity in the list
- Enter the Resignation Date
- Click Save
This shows that the person or company was previously involved but is no longer active.
Upload Supporting Documents
You may be asked to upload documents in:
- Company Structure
- Company Documents
To upload a document:
- Click Upload
- Select the file from your computer
- Confirm the upload
Accepted file formats: .png, .jpeg, .jpg, .gif, .pdf, .doc, .docx
Save Your Progress
You can save your progress at any time.
Click Save and Continue to:
- Save your entered information
- Move to the next section
If required fields are missing, they will be highlighted so you can correct them.
Submit the Form
After completing all sections:
- Review the information carefully
- Add any additional information (if needed)
- Click Submit
After submission, your update will be prepared for confirmation.
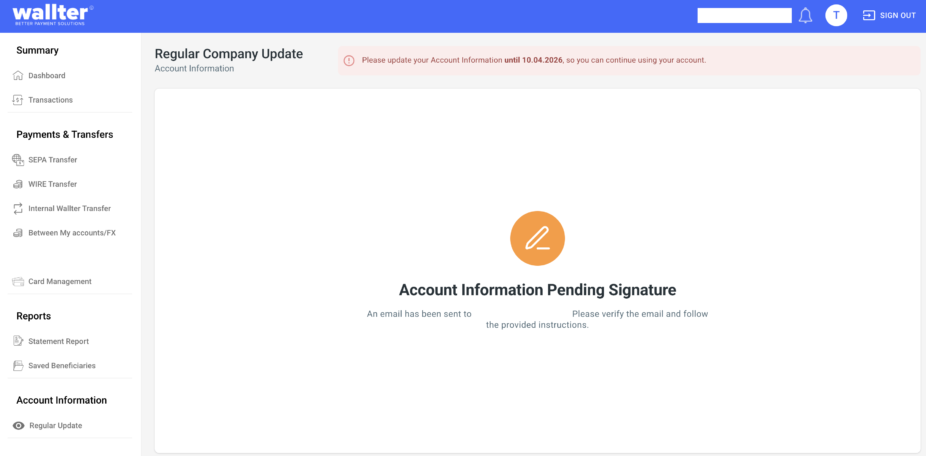
Sign the Confirmation Form (CIUD)
After submitting the form, the Authorised Signatory will receive an email from DocuSign.
This email contains a secure link to sign the Client Information Update Declaration (CIUD).
To sign the declaration:
- Open the DocuSign email
- Click Review Document
- Read the declaration
- Follow the signing steps
- Click Finish
✅ Confirmation
After the CIUD is signed:
- Your update is submitted for compliance review
- The Regular Update section will disappear from the Client app
In some cases, we may request:
- Additional documents
- Clarification of submitted information
If needed, our Support team will contact you by email.
🕐 Deadline
You have 30 days to complete your Regular Company Update after it becomes available in the Client app.
To complete the process, you must:
- Submit the Company Update form
- Sign the CIUD via DocuSign
Both steps must be completed within 30 days.
⚡Important
Submitting the form alone does not complete the process. The update is considered complete only after the CIUD is signed by the company’s Authorised Signatory.
- If the form is submitted but the CIUD is not signed, the update will remain incomplete.
- If the form is incomplete or the CIUD has not been signed, reminder notifications may be sent before the deadline.
Need Help?
If you experience issues or need additional time, contact our Support team: [email protected]
Company Licenses & Regulations
Wallter is regulated by the Central Bank of Lithuania and follows the PSD2.
Yes, follow the link to see Wallter’s license.